What is an underprint ?
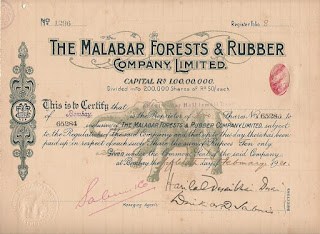
When two different designs are printed over one another, then we speak of a design with an underprint.
 |
| Malabar Forests and Rubber Company Shares of 50 Rupees (10 Rs. paid up) Bombay, 1921 double-click to enlarge |
On the example above, we can distinguish two printing designs : an elephant (the underprint design) and the main design containing the share's text that was printed on top of the underprint.
Not all underprints are so clearly recognizable as our fierce elephant shown above. A good example is a certificate of the Charbonnages André Dumont, a Belgian coal mining company.
 |
| Société Anonyme des Charbonnages Andre Dumont English: André Dumont Coal Mines company Kasbon 10 Frank, unsigned 17 May 1940, Waterschei (Limburg province, Belgium) |
Well, you actually can't call this a bond, though the word 'Kasbon' (English: savings certificate) is printed on the certificate. From Schwan-Boling's World War II Remembered, we learn that it is a local Belgian emergency note printed between the initial German attack, 10 May 1940 and the Belgian surrender on 28 May 1940. Due to the initial chaos several communities were forced to issue emergency currency.
So far for history. The image shown is not a bad scan. The actual piece is just printed in such subtle colors. Reducing contrast is the trick that will result in an image with a more recognizable underprint, as you can see here.
 |
| Image of the same certificate, but with strongly reduced contrast settings. Double-click to enlarge. |
For the record, I am not in favor of embellishing images of scripophily papers. Images should represent the true look of the certificate. However, I see no problem in editing images for researching purposes.
What is contrast ?
In digital image editing, the word contrast stands for the difference between dark and light. When increasing contrast, the darker pixels are pushed towards black and the lighter pixels towards white. Otherwise said, the difference between the tone of a darker pixel and a lighter pixel is increased. The opposite action, decreasing contrast, yields more visible shades of darker and lighter pixels.
How can you decrease the contrast ?
You need a digital image editor which is a piece of software that you use to edit digital images. I have tried the following software products : MS Digital Image 2006 Standard Edition Editor and Picasa 3, both locally installed on my desktop, and Pixlr Editor an online photo editing software, see here . The latter allows you to upload your image, edit and share it to other social platforms or download it back to your desktop.
Something that struck me was that each of these softwares handle a different name for the contrast editing function. In the mentioned products, this is the function that you should apply for decreasing contrast :
- MS Digital Image 2006 : in the Touch-up menu, decrease Contrast
- Picasa 3 : in the Tuning tab features, increase Shadows (yes 'decreasing contrast' has the same meaning as 'increasing shadows')
- Pixlr Editor : in the Adjustment menu, increase Contrast in combination with a decrease of Brightness
 |
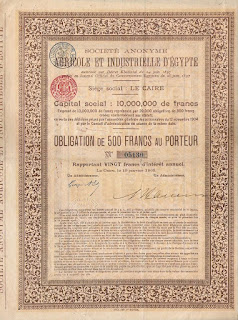
| Société Anonyme Agricole et Industrielle d'Egypte detail of the underprint of the bond listed above After reducing contrast in Picasa, the remnants of an ancient temple appear. Double-click to enlarge. |
What if the underprint is still not clear ?
To illustrate this topic, I'll use the Japanese bond depicted below.
This patriotic WWII bond was issued by the Japan Hypothec Bank in 1942. Between Dec 1937 and Aug 1945 this bank sold over 4.2 billion Yen in war bonds, most of them in denominations of 15 Yen or less. This particular bond shows a falling bomb with the Japanese name 大東亜戦争 which means Greater East Asia War. The term was introduced to mark the period when Japan extended the war from a regional conflict in China to a wider war all over South-East Asia and the Pacific. The red rays behind the bomb are derived from the Japanese military flag and represent the sun.
Schwan-Boling's book mentions that the bond was printed by the Toppan Printing Company from Tokyo. As an anti counterfeiting measure, the large red serial number was printed on the face and back of the certificate. The number on the back was the mirror image and aligned perfectly with the one on the face. Extremely difficult to reproduce.
5 Yen patriotic wartime bond 1942
issued by the Nippon Kangyo Ginko (English: Japan Hypothec Bank)
-
-
The blue round logo of the bank is printed at the top
and is repeated several times as a watermark.
double-click to enlarge
and is repeated several times as a watermark.
double-click to enlarge
There is also an underprint but it is hardly noticeable. So, as I did before with the other certificates, I scanned the certificate and reduced the contrast in the image. This was the result : no significant improvement. The underprint was still unclear.
 |
| The underprint is still not very visible after reducing contrast. |
Miserable molecule of mildew! The only thing I could think off, was using the edited image, not the originally scanned image, again as input for the image editor software. So I reduced the contrast on that "second generation" image, and that gave a better result. Now, you can see that a map appears in the underprint. Visible is : China, the South Korea peninsula, Japan's major islands Hokkaido and Honshu, and Taiwan as well.
 |
| Double-click to enlarge and detect a map of South East Asia. |
Summary of the procedure
- Scan the certificate with an underprint.
- By means of a digital image editing software, see some examples above, reduce the contrast drastically, and save the resulting image.
- If the underprint is still not clear, then repeat step two, but instead of using the original scan, use the resulting image from that step.
Another example where I reduced the contrast of an underprint, can be seen here .
I'm sure that some of you have similar certificates.
Were you able to reveal the barely visible underprint ?
Did you follow the same approach ?
F.L.
p.s. Concerning the bond with the hidden map: to be honest, I am a bit disappointed that I didn't find a spot on the map marked with an "X". 8)
N.B. More nice examples of underprints can be found here and there .


No comments:
Post a Comment